These instructions provide a step-by-step guide to help you get set
up in Windows 2000 (Professional, Server, or Advanced Server editions)
to connect to NETPLEX. This also shows you how to connect for the
first time and disconnect when you're finished to get you started.
Below, we also show you how to make it easy to connect from your
Windows Desktop, and how to disconnect when you're through using the
Internet.
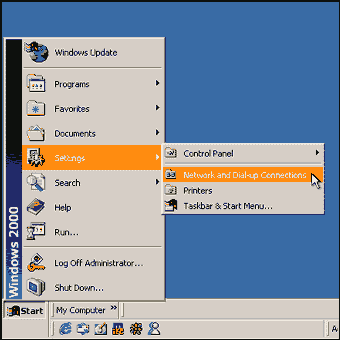
Step One:
In your Windows Start Menu, go to Settings and select
Network and Dial-Up Connections as shown here.
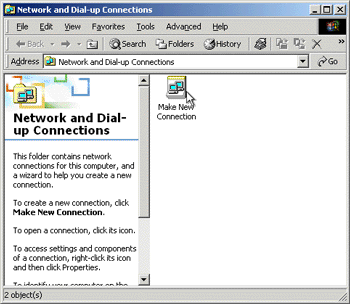
Step Two:
Double-click on the Make New Connection icon located in
this folder.
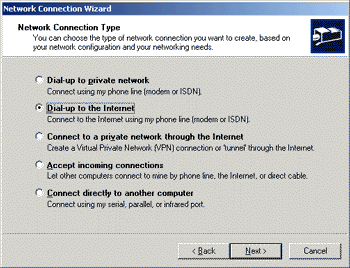
Step Three:
Select Dial-Up to the Internet from the options presented
to you in the wizard. Then, click Next.
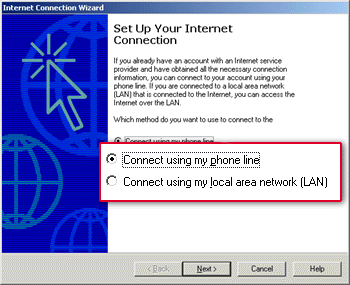
Step Four:
Choose to connect by using your phone line when prompted.
Then, click Next.
Step Five:
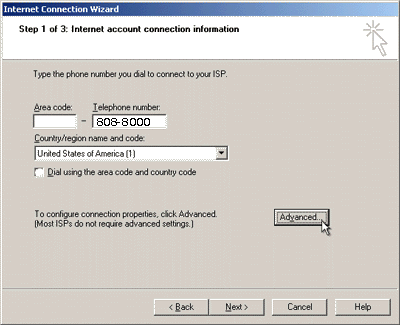
Once inside the Internet Connection Wizard,
enter the local
access number you wish to dial into.
When you're finished filling in this screen, click the Advanced
button.
Step Six:
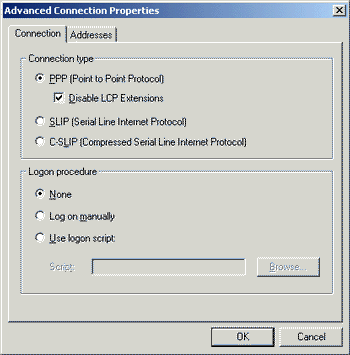
After clicking the Advanced button, an Advanced Connection
Properties dialog will come up.
On the Connection tab, ensure that PPP is selected, and that
you put a check in the box that says Disable LCP Extensions.
Step Seven:
Then, Select ISP automatically provides IP address and DNS server
address.
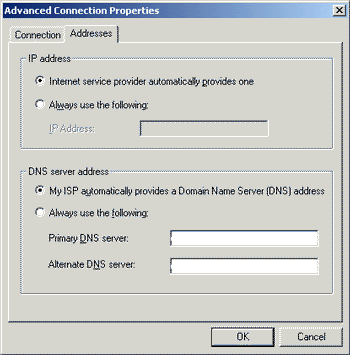
When finished, click OK to get back to the phone number box.
Then, click Next.
Step Eight:
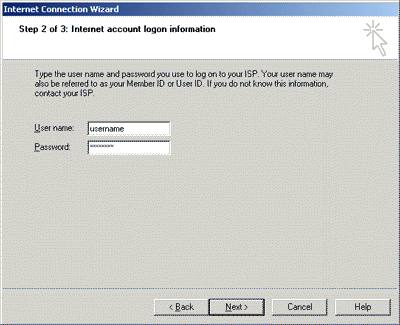
Enter the username and password you were assigned
to connect to NETPLEX. These will be all lower-case letters,
please make sure that the Caps Lock light is off on your
keyboard to ensure you're typing this correctly. When
finished, click Next.
You'll then be prompted to give this connection a name. Type in NETPLEX
for the name of this connection.
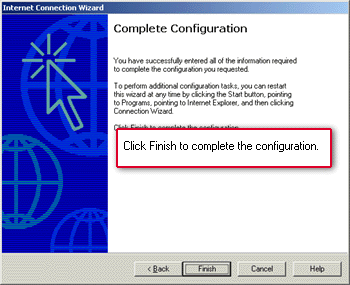
Step Nine:
Save this configuration and complete the process by
clicking the Finish button once you've Reached
this Part.
Step Ten:
You'll notice a NETPLEX icon now appears in
the Network and Dial-Up Connections folder. You
can use this directly to get connected by double-clicking
on it, or to make it easier, you can create a "shortcut"
to it from your desktop. Here's how:
Right-click on the icon to make a menu of options
pop up. Select Create Shortcut from this menu.
This will prompt you to let Windows know if you would
like a shortcut placed on the desktop. When asked, click
Yes.
An icon, such as the one shown here will appear on your
desktop. To connect to NETPLEX, just double-click
on it.
Congratulations!
If you've come this far, you have successfully finished
setting up your Microsoft Windows 2000 computer to connect
to NETPLEX!
Here's some more information to help you learn what
to do next...
Getting Connected:
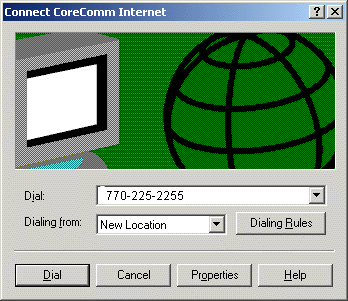
Once you open that shortcut from your desktop, you'll see this
screen prompt you, verifying the number, and giving you the option
to change properties, cancel, or dial right up. To connect, simply
click Dial.
Windows will let you know that you're connected, and at this point,
it's up to you what you do next.
Once this far, you can use any Internet application you like. For
example, you might choose to go browsing on the Web using Internet
Explorer or Netscape Navigator, or read your e-mail by using Outlook
Express or Netscape Messenger.
Disconnecting from The Internet:
When you're done and would like to disconnect form NETPLEX, you
can simply right-click on the Connection Status icon in your
System Tray (the area with the small icons by your clock). When you
do that, a menu will pop up allowing you to disconnect from right
there.


